This Years Crafts
Sweetest Christmas Tree

©2006 Publications International, Ltd
Here is a completed
Sweetest Christmas Tree.
|
This golden tree will dazzle your guests! Or take it for a hostess gift -- it will surely sweeten that party. Here's what you will need to begin:
- 6-inch terra-cotta pot
- White acrylic paint
- Paintbrush
- 3 gold doilies, 6 inches each
- Scissors
- Gloss decoupage
- Foam paintbrush
- Clear gloss spray
- 17-inch tall foam cone, 5- to
- 6-inch base
- Low-temp glue gun, glue sticks
- 7 silk evergreen branches
- Wire cutters
- 6 gold berry picks
- Chenille stems
- Gold-foil chocolates
- 4 yards sheer gold ribbon, 3/4 inch wide
To construct a Sweetest Christmas Tree:
- Paint pot white; let dry.Cut doilies into quarters. Decoupage doily pieces to pot, overlapping freely. When dry, use spray gloss to seal.

©2006 Publicaitons International, Ltd.
Decoupage the doily pieces to the pot.
|
- Glue foam cone into pot. Cut evergreen branches into 2- to 3-inch pieces. Insert pieces into cone until almost covered.
- Separate and twist berry picks into 4-berry clusters. Insert berry clusters around tree.
- Cut chenille stems into 3-inch pieces. Glue end of stem piece to back of a chocolate, and push unglued stem end into foam. Repeat for all chocolates.
- Cut the ribbon in half. With half of ribbon, wind it around tree, tucking and spot gluing as you work. With other ribbon half, tie a simple bow in middle of ribbon, and glue bow to top of tree. Let long ribbon tails fall gracefully on table.
- Score each card along the fold lines to make it easier to fold. To score, just run one edge of a pair of scissors along the fold line using a ruler. You can use a pizza cutter instead if you have one handy. Be careful not to press too hard so that you do not cut through the paper. You can also press hard with a ball point pen.
- Carefully wrap the star in tissue paper and place into a marked box for next year.
- This can also make a nice activity for a New Year's Eve celebrated at home.
- Wrapping paper also works well.
- It is VERY important to be sure that the triangles of the base and the triangles formed by the cardstock are the SAME size before attempting to assemble this.
- This project doesn't necessarily require Christmas cards. Any decorative, heavyweight paper will work. (IE: For a Coca Cola themed tree, use Coca Cola soda boxes.)
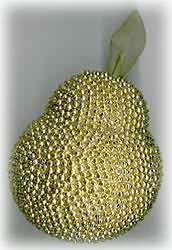
Homemade Beaded Pear Christmas Ornaments
Here's how to make a slightly unusual Christmas ornament for your Christmas tree - a golden pear, studded with golden beads. Each one of the beads is individually placed on the ornaments - not hard to do, but rather time-consuming, so this is a good little project to occupy your hands while listening to the radio or watching television.
Once you have all the gold beads in place, the effect is one of luxurious simplicity.
Copyright © 1999-2008 Susan Spatone All rights reserved.
Published with permission from CraftAtHome.com
Craft Supplies:
3 inch styrofoam ball
5 inch styrofoam ball
Gold beads
Gold straight pins
Small twig piece
Tacky glue
Small leaf
Craft Project Instructions:
Cut your 3 inch styrofoam ball in half and gently remove some of the inside centre area of where you cut the ball. This ball needs to fit snugly to the other ball to form the pear shape. Once you have your 1/2 ball ready to fit, secure it with tacky glue and allow to dry completely before going to the next step.
Using a small piece of twig (1 inch long), poke through the top centre of the pear shape with the twig and leave approximately 1/2 inch of the twig exposed (refer to photo). Remove the twig from the hole you have just made in your ball and fill the hole with a little tacky glue. Insert your twig along with a small leaf into the hole and allow the glue to dry.
Create a little indent at the bottom centre of your pair, by poking gently with your finger. This creates the indent found on a real pear.
Now comes the part where you'll need tons of patience. Beginning at the top of the pear and working your way down, place a pin through the bead hole and push the pin into the ball. Continue doing this until all of the ball is covered with beads. Don't worry if some of the beads become a little loose as you are working.
Now that your ornament is complete, prepare a mixture of one part tacky glue and one part water. Holding the ornament from the twig, dip your entire beaded ball into this mixture, making sure that the entire beaded area has been immersed in the solution. Allow the excess glue to drain from the ball. With a wet hand, gently press all the beads in place and at the same time wiping away any excess glue around the ornament.
Set your ornament on a piece of wax paper or plastic wrap to dry completely.
How to Make Beaded Fruit Tree Ornaments
What could be more inviting that a tree adorned with glistening miniature fruit in an array of colors? Bright red apples and yellow pears tempt the pallet as they dangle from tree branches amid garlands of popcorn and nuts. These beaded fruits are reminiscent of the early German trees where fruit and nuts were hung to decorate the tree and provide a special treat for Christmas guests. These miniature fruits are easy to make and will last for years to come.
Difficulty: Easy
Things You'll Need:
- Miniature artificial fruit
- White craft glue
- Toothpick
- 6mm colored beads
- Newspaper
- Jar
- Silk leaves or evergreen sprigs (optional)
- Decorative ribbon
-
Step 1
Purchase a variety of miniature artificial fruits. You can often find these in the dollar store. Select fruit that is well-formed and easily recognizable by shape. The color or appearance of the fruit is not important. You need the fruit for the base.
-
Step 2
Prepare a work area where you can leave the fruit to dry. Cover the area with old newspapers to catch glue and to make clean up a breeze.
-
Step 3
Cover a small area of the fruit with white glue. Spread with a toothpick to get an even coat. Select glass beads that best match the color of the fruit. Glue them into place so that the open end of the bead faces outward. Begin at the widest part of the fruit and glue an even line of beads around the circumference. Fill in sections of the fruit by gluing beads so that they are touching and the entire area is covered. Set the beaded fruit over the open mouth of a jar to dry.
-
Step 4
Hot glue one or two silk leaves at the base of the stem or add a sprig of evergreens. Attach a loop of decorative ribbon to the stem of the fruit and hang it as an ornament on the tree.
-
Step 5
Make a variety of fruits in varying colors and display them in a glass bowl as a sparkling centerpiece. Add evergreen branches with natural cones. Light a candle to create flickering light.
-
Step 6
Display over the mantle among evergreens and cones or use on garlands and swags to drape over doors and windows.
Festive Polka Dot Ornaments
By: Amanda Formaro
Difficulty: Easy
Age: 6 and up
Average User Rating:
Parental supervision is recommended
These are so easy to make you will be amazed. Grab some glass ball ornaments and some paint and decorate these pretty and festive tree accents!
For more activities, be sure to visit our main Christmas page. Don't forget to check out our other Christmas crafts, recipes, printables, games, clip art and coloring pages.
What you'll need:
- Glass ball ornaments
- Red and green acrylic paint
- Paint brush
- ribbon
- empty egg carton
How to make it:
- Turn the empty egg carton upside down. This will serve as your stand as you decorate.
- Place ornament upside down on egg carton, resting it between egg cups.
- Using the handle end of a paint brush, dip the end of the handle into paint then dot onto the ornament. You will need to re-dip after each dot.
- Dot all around the ornament and let dry completely.
- Once dry, tie a piece of ribbon through the hanger hook on the ornament.
Tips:
- You can use clear glass ornaments for this easy project, or if you prefer, use frosted or colored bulbs, adjusting the paint color accordingly.
- Glass ornaments are available in abundance at most stores that carry holiday decorations. You may even have some packed away in your Christmas boxes!
- Change the size of the polka dots by using different sized paint brushes.
Glitter Glue Ornament
Difficulty: Very Easy
(0/5)
Holiday Links
A little glitter glue turns an ordinary glass ornament into a sparkling Christmas craft for kids.
What you'll need:
- 2" glass ball ornament
- Ornament hook
- Glitter glue pen
- Glue, optional
- Glitter, optional
How to make it:
- Take the glitter glue pen and draw a spiral or another design on your ornament.
- Attach the ornament hook. Hang the ornament and let dry.
Christmas Bell Ornament
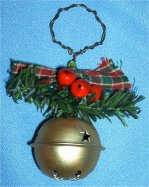
Materials needed:
A metal Bell (approx. 1 ¼” to 1 ½” in diameter)
A 1” x 4” fabric scrap or ribbon
12” of 19 or 20 gauge wire
3 fake red berries on wire stems
4” piece of 1” wide green garland
wire cutter and a needle nose pliers
Procedure:
- Pull the wire half way through the top hole in the bell (the hole for the hanger).
- Twist the two sides of the wire around each other, twisting up about 1 inch. Use a needle nose pliers to hold the wire in place while twisting.
- Form a loop with each side of the wire and twist the remaining wire around the sides of the loop.
- Center the green garland on the wire hanger and twist it on.
- Twist on the red berries right above the green garland.
- Tie on the rag ribbon. No need to make a bow, just tie a knot.
This is a fun & easy project for both kids and adults! Any size bell will work, just adjust the size and length of your garland and ribbon.
© Copyright 2000 Lily Hadrava & www.pinecountrydecor.com
Lily Hadrava
Pine Country Decor
www.pinecountrydecor.com
mailto:countrydecor101@yahoo.com
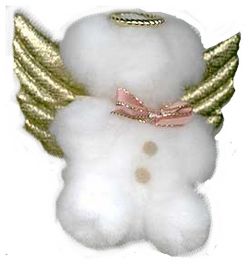
Teddy Bear Angels
Turn a few pompoms into a teddy bear angel that you can wear as a pin, or use as a Christmas tree decoration.
Copyright © 1999-2008 Susan Spatone All rights reserved. Published with permission from CraftAtHome.com
Craft Supplies
1 - 2 inch pompom (tummy)
1 - 1 1/2 inch pompom (head)
7 - 1 inch pompoms (hands, feet, tail)
2 - 1/8 inch pompoms (buttons)
(pompom sizes will vary with different manufacturers, all sizes listed are approximate)
Tacky Glue (hot glue for grown ups)
1/4 inch Wide Scrap Ribbon
Scissors
Angel Wings (ribbon bow can replace the wings)
Gold Ring for Halo
Craft Project Instructions:
Glue the 2 inch pompom and the 1 1/2 inch pompom together (this forms the head and body). Trim away a little fluff from one side of both pompoms. The trimmed area will flatten the bears tummy and face.
Glue two 1 inch pompoms for arms, two more for legs and 2 more for ears (refer to the photo for placement).
Glue one 1 inch pompom to the back centre bottom of the 2 inch pompom, for a tail (this will help Teddy to sit up on his own). Glue two 1/8 inch pompoms on the tummy (you can use buttons or beads for this instead).
Tie a small bow and glue in place on the teddy's neck. Glue angel wings to the back of the bear and glue a small gold ring to the top of his head.
Optional: to add a face, simply glue or sew on a couple of beads or buttons for eyes nose and a mouth. You can also add a push pin or broach pin to the back of the teddy and use on your bulletin board or wear the cute little bear.
Bead Wreath Ornament Craft
This is one of the easiest bead crafts that you can make. This small wreath ornament is made with a combination of beads and sunburst or paddlewheel beads. Feel free to use whatever beads and colors that you like, noting that the more you vary the color and texture of the beads, the better.
If you have any other delightful bead or wreath creations that you would like to share, please let us know.
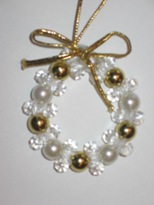
Craft Supplies Needed
- 10- 12mm sunburst beads (also called paddlewheel or wagon wheel beads
- 5- 8mm gold beads
- 5- 8mm pearl beads
- 6" length of gold cording for a bow (or gold ribbon)
- 7" of gold cord to hang the ornament
- 7" white chenille stem to form the wreath (or wire or ribbon)
- Glue gun (or wire to put on the bow)
- Wire cutters
Crafting Steps
- Take the chenille stem and begin to thread the beads on the stem, making sure to alternate gold bead, sunburst bead, pearl bead, sunburst bead, gold bead, sunburst bead, etc. (Length of stem can vary depending on the desired size of wreath)
- Twist together the ends of the chenille stem and cut off the excess.
- Place the gold cord around the area where you just tied the chenille stem together to form a hanger for your wreath.
- Form a small bow out of the gold cording (or gold ribbon)
- using a hot glue gun, affix the bow to the wreath, and allow it to dry.
- Enjoy !
Tri-bead Wreath Ornament Craft
Made of clear and green tri-beads, this cute wreath ornament is easy to make and is a great Christmas craft for kids, and an easy ornament for teachers to show their children.
If you have other wreath crafts that you would like to share with us, let us know.
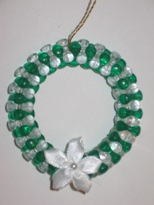
Craft Supplies Needed
- 22- Clear Tri-beads
- 22- Green Tri-beads
- 8" length of wire
- bow (optional two bows to put one on each side)
- Wire to attach the bow or a glue gun
- Needle nose pliers
- Wire cutters
Crafting Steps
- Thread the clear and green beads onto the wire, alternating the colors as you thread them onto the wire.
- Making the wreath as tight as you can make it, twist the wires together with the needle nose pliers and then cut off the excess wire with the wire cutters. You now have the circle that forms the wreath.
- Now attach a bow (or you can attach two- one on each side of the wreath) with wire or a glue gun to the same location that you just tied the wires together. (This will help hide where the wires meet)
- Enjoy !
Optional: You can make the wreath as large as you like. You may also want to make wreaths of different colors.
Rudolph Clothespin Ornament
Three clothespins and a few decorations make an easy Christmas craft for kids. This cute little reindeer happens to be Rudolph, but feel free to make enough to pull Santa's sleigh. And you don't have to settle for simple, with a little imagination, you can have your reindeer dressed for any occasion.
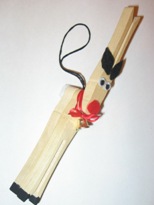
Craft Materials
- String in black, white, green or red
- Scissors
- Glue (Elmer's will work fine)
- 3 old fashioned clothespins
- 1 piece of red felt
- 1 piece of black felt
- 1 small white pom pom
- 1 pair of wiggly eyes
- thin red ribbon in red, white or green
- small bell
- black paint and paintbrush (or permanent marker for adults)
Crafting Steps:
- Cut a 6" length of string and tie the ends together to form a loop.
- Glue the knotted end of the string between the heads of two clothespins to create the reindeer's body.
- To create the reindeers head, glue the third clothespin upside down onto the first two.
- When the glue has completely dried, attach a circle of red felt for a nose, a white pom pom for a tail and the pair of wiggly eyes.
- Cut two ears from the black felt and glue them to the base of the reindeer antlers.
- Tie the piece of thin red ribbon with the bell strung on it around the reindeer's neck.
- Lastly, paint the reindeer's hooves with black paint, or with a permanent magic marker (for adults)
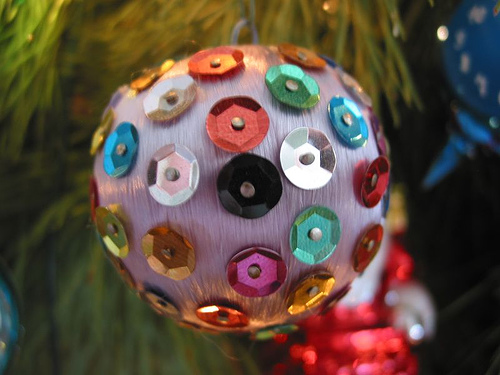
How to Make Styrofoam Christmas Ball Ornaments
Instructions
Things You'll Need:
- Straight pins
- Sequins
- Beads with small holes
- Styrofoam balls (2" in diameter or larger)
- Hot glue
- Gold string
- Black marker
- Scissors
-
Step 1
Decide whether you are going to use sequins or beads for your ball. Sequins will be less time consuming, but they are harder to make pictures with. If you go with sequins, you should either pin them on the ball randomly or just make a pattern. You will not be able to make a sharp picture. Beads are far more time consuming to apply, but they make beautiful, intricate pictures. Some people stack the beads and sequins, but you probably should not do this for your first ball.
-
Step 2
Draw a design lightly on the Styrofoam ball. Make simple shapes or patterns, such as zig zags, Christmas trees or gifts. Remember, you will probably not be able to shade your drawings, so they need to be relatively easy to recognize if you are going to make pictures with the beads.
-
Step 3
Hot glue a loop of gold string to the top of the ball. The loop should be large enough to attach an ornament hanger to it--at least the circumference of your thumb. The longer the loop, the farther down off the branch the ball will hang. Use a tiny dot of glue to hold the loop in place.
-
Step 4

This ball is not entirely covered with sequins, giving it a polka-dot look.
Fill in the design using the beads or sequins. Stick a straight pin through the tiny hole in the center of each sequin or bead. The pin will fit flush with the top of the bead or sequin and penetrate the Styrofoam ball, holding the decoration in place. The head of the pin will hardly be visible, so it will look as if the ball is made of beads or sequins once you have covered the entire thing.
Styrofoam Ball Christmas Ornaments |
| Amy's Ribbon-Wrapped Ornaments
You will need:
- Styrofoam ball
- 1/4" satin ribbon
- Dressmaker pins
- Christmas cording
- Ribbon for a bow
- Pearls, beads or other decorations
- Hot glue
Take a large pen and poke a hole all the way through the center of the ball. Secure the ribbon with dressmaker pins at one end and basically just wrap the ribbon around the ball through the hole. At each end of the hole, I secured the ribbon with a pin. Then after you cover the whole ball, you can push some pretty cording through the hole and tie a knot at the bottom and make a bow or something like that at the top for a loop to hang on tree. I'm also gonna hot glue some irridescent pearls on some of them.
Contributed by Amy |
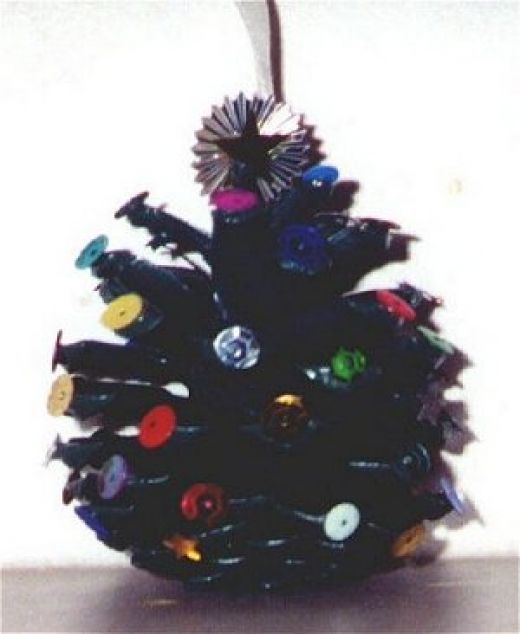
Pine Cone Tree Ornament
Make a tiny Christmas tree using a pine cone. A great ornament for your own Christmas tree.
Materials Needed:
- Pine Cone
- Paint
- Sequins, Beads, Etc.
- Ribbon
- Glue
Instructions:
Cut a six inch length of ribbon. Tie it into a circle and glue the tied section to the pointy tip of the pine cone. Hold the pine cone by the ribbon and paint it green. While the paint is still wet, sprinkle glitter on your pine cone if you like.
When the paint is dry, use miscellaneous supplies to decorate your pine cone so it looks like a miniature Christmas tree. Here are a few ideas of items to use:
- Yarn
- Rick-rack
- Beads
- Sequins
- Small Buttons

More Crafts
Beaded Star Tree Trims
Copyright 2002-2008 © Jane Lake All Rights Reserved
Here's a beaded star tree trim to add to your homemade Christmas ornaments. So quick and easy to do, you'll want to make lots of them in different colors of beads.
Homemade Beaded Star Ornament
Supplies you will need:
- craft beads in assorted colors
- chenille stems
Beaded Star Tree Trim Instructions
Remarkably easy, but a lot of fun to make!
You can vary the look of these homemade beaded stars by changing the colors of the chenille stems and the beads, both of which are availabe at most dollar stores for a reasonable price.
You will need five chenille stems for each star and beads that fit snugly on the chenille stem wires.
Simply cut five colored chenille stems into 4-1/2" lengths (gold looks nice and adds glitter). Cut five white chenille stems into 3-1/2" pieces.
Lay three of the colored stems on the table, top with the five white stems and then with the last two gold stems. Wire these together in the center with a small piece of either colored stem, and snip of the excess wire.
Fan out the star "rays" in all directions, alternating colors.
Now slip beads in place, allowing some space between beads, and following an orderly pattern. For instance, in the larger photo above, the star has a red bead placed on each white stem, which is then topped by a transparent bead and a pink bead. The gold stems had transparent, green, gold and pink beads threaded on, in that order.
A huge amount of creativity is possible with this small Christmas craft. You may decide to make an all golden star, with only gold rays and golden beads; or a twinkling star with gold and silver rays and only transparent or silver beads. There's also a wide variety of colors available in Chenille Stems  at Joanns.
These beaded starts look nice as accents on a garland, but with the finished size being 4-3/4" in diameter, you should also have plenty of room on your Christmas tree for an assortment of beaded star ornaments!
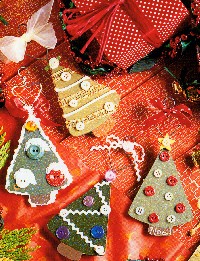
Christmas Tree Ornaments
These delightful ornaments will add a special touch to your Christmas tree. Use whatever leftover trims and ribbon you have around your house -- and your imagination -- to decorate them.
You'll Need:
- Precut wood tree ornaments
- Acrylic paint: gamel, forest green, spice brown, antique gold, white, metallic gold
- Brushes: #8 shader, 10/0 liner
- Low-temperature glue gun, glue sticks
- Trims: assorted lengths of white and gold rickrack, material strips, red satin ribbon, off-white rattail cord, gold trim, cream sheer ribbon, ribbon roses, gold cord
- Scissors
- Sparkle glaze
- Assorted buttons
- Precut 3/4-inch wood star
- Old toothbrush
- Floral accents: pale gold highlighter, gold glitter spray
- Decorative snow
- Acrylic spray
To Make Christmas Tree Ornaments:
- Paint some ornaments gamel and some forest green. Paint tree trunks spice brown.
- Child's Tree: Glue rickrack to tree; paint with sparkle glaze. Let dry. Glue on pastel buttons. Tie a rickrack bow around hanger.
- Country Tree: Paint wood star antique gold. Tie rag bow; glue to wire hanger. Glue star to tree. Glue burgundy and small white buttons to tree. Using liner brush and white, paint. "Noel" on trunk. To fly speck, dip toothbrush into white paint and drag finger across bristles. Let dry.

©2006 Publications International, Ltd.
Drag finger across toothbrush
bristles to fly speck. |
- Antique Memories Button Tree: Tie a red satin bow and glue to wire hanger. Glue 4 old buttons and fly speck tree with white paint. Dab snow with shader brush on tree and top of buttons. Let dry.
- Victorian Bridal Tree: Glue gold trim and off-white rattail cording to tree. Tie small bow of cream sheer ribbon to hanger. Glue ribbon rose to top of tree. Glue cream buttons to tree. Mist with gold glitter spray. Let dry.

©2006 Publications International, Ltd.
Hot-glue buttons to tree. |
- Traditional Gold Tree: Glue gold rickrack to tree. Tie bow of gold cording; glue to top of tree. Glue buttons to tree. Mist with gold highlighter. Let dry. Add dots using handle of liner brush dipped into metallic gold paint. Let dry. Mist all trees with acrylic spray.

©2006 Publications International, Ltd.
Use handle end of liner brush
to add gold dots.
|
You will need 20 cut cards
Gluegun
Sissors
Each Christmas, it seems we receive more and more beautiful greeting cards. We often place them on the mantelpiece to enjoy them. But when the holiday is over, we take down the tree, clean up the clutter, and look wistfully at the lovely cards as we remove them one by one. Here is a beautiful project you can complete using some of those cards; you can even use this card star to top your tree next year!
-
Print out this pattern.
-
Copy the pattern onto the interior of your cards (so that the cover design is on the other side) by cutting it out and tracing it. Then draw in the fold lines with a ruler. See the Tips for how to score the fold lines.
-
Cut the pattern out and start folding! This would be a great time put on some music and invite the family to help. To make this Christmas star, you'll need to cut 20 cards.
-
Close the triangles. Use your favorite glue along each of the long flaps to seal the point of each star.
-
Print out this pattern. Use heavy card stock or print your pattern onto regular paper and then paste the pattern onto a cereal box or other light cardboard. This will be the body of the star.
-
Cut, score and once again fold along all the lines.
-
Glue together carefully.
-
Glue the points onto the star until it's done! Give it time to dry and you'll have a beautiful decoration made out of recycled Christmas cards.